
Tuesday, 26 May 2009
Shot 59 - Prisoners Celebrating
This is the shot where the prisoners celebrate their escape after pulling the pin out of the train coupling, allowing their carriage to get away!
Shot 30 - Train Speeding Up
This is a quick playblast of the train speeding up after the driver is knocked unconcious. It gives a good idea of the pace we want to use later on. Also the low angle I feel makes the train look menacing and dangerous at high speed. We will add more foreground elements to emphasise the speed
Monday, 25 May 2009
Photoshop Elements for Textures
Here are some of the Photoshop elements that I have had to work on in order to use as textures in Maya and as layers in After Effects.
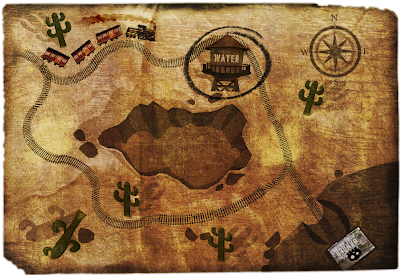
Tony has worked to design the map but to get it to work in Maya I have boosted up the colour by multiplying more textures and I have also given the map an edge so it seems like a worn piece of paper. This means we wont get perfectly square shapes for the map.
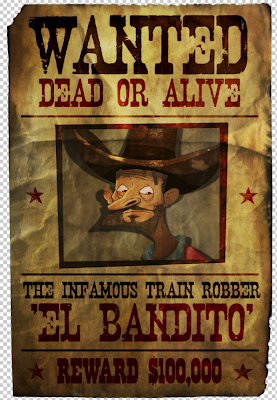
I have done the same for the Wanted Poster which the Sheriff displays. Using Tony's illustration I have created the typography on the poster in the style of the Wanted Poster Intro at the beginning.
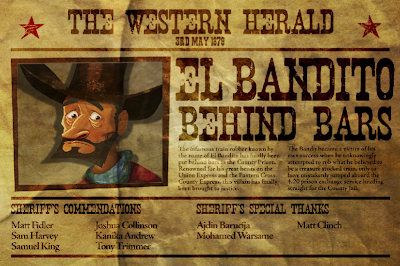
Finally I have created this newspaper style graphic to be used in After Effects at the end. Obviously the image will change to an illustrated version by Tony of the Bandit behind bars which will transition effectively from the 3D to After Effects and then back again.
Compositing Process

Compositing is a really important process to bring the render passes together and then also add some finer details and effects which would be extremely complex to add in something like Maya. As you can see in the example above we have a number of layers brought together to form a shot. Here is a breakdown of the layers: -
- ZDepth - This is used in conjunction with a Lens Blur filter to each RGB layer and it creates the effect of Depth of Field, meaning the objects that are far away can be blurred out of focus while the foreground elements remain sharp and in focus.
- RGB Layers - These provide the colour and lighting and overall texturing.
- Occlusion layers - These work out where light should not pass in certain zones. By multiplying these layers onto the RGB, it then adds more shading and shadows.
- Smoke Pass - This is for the main dynamics in a scene, very important for our train shots but not used in most shots throughout the film.
- Train Effects - The train RGB layer, or any layer for that matter can be duplicated so that a particular area can be affected in a certain way. In this shot I have masked the pistons of the train and tracked the camera movement so that a directional blur can be applied to exaggerate the speed of the pistons.
- Effects layers - Lots of subtle effects are added in After Effects. In this scene I have added dust blowing down the side of the train to show the sand kicking up as the train speeds past. In other shots I will add dust blowing across the desert floor and things like bullet ricochets, sparks and dust crashes.
By adding all these elements together it adds to the realism of the shot and builds up the complexity of the motion, something much easier to do in post production than in Maya.
Dynamics and Smoke Rendering
Sam and I have also been working on the smoke passes to try and get these looking quite realistic. Getting the colouring and feel of the smoke is quite difficult in Maya alone so using After Effects also I have managed to manipulate the render to look good. Sam has created a basic smoke emitter in Maya and then parented this to the funnel which I have exported from the scene of the shot. This then ensures everything matches up, along with the camera angle also.

His final render then looks something like this, and then in After Effects we place this behind the train layer and composite it in. I have then added a number of effects to alter colour, tone, contrast and blur on this layer and then duplicated also to use two contrasting layers which multiply through one another. This gives us a final effect like in the example below.


His final render then looks something like this, and then in After Effects we place this behind the train layer and composite it in. I have then added a number of effects to alter colour, tone, contrast and blur on this layer and then duplicated also to use two contrasting layers which multiply through one another. This gives us a final effect like in the example below.

Rendering Process
Sam And I have recently started rendering out the shots and this is the process we have started using to bring them together ready to composite. Rendering requires several passes in order to get a better look to each shot. Within Maya we set up different render layers which will all commence when we hit 'batch render'. This is what the layers look like in Maya.

Basically to create render layers we select the objects we need in that layer and then add them to the necessary layer. Below is what an RGB layer for the train looks like in the viewport.

The RGB pass provides the colour for the particular layer and this takes into account the lighting which must be added to the layer also. We then run an occlusion pass which simulates the way light would hit objects. For example it will add darkness to small crevices or areas where light would not emit or reflect so much. Again below is how this pass appears in the viewpoint, basically a black shape.

Once we run the render pass we then get the following kind of result outputted as a TIFF. This is the basic RGB.

And this is the Occlusion pass for the same object.

Obviously when rendering we render out sequences of TIFF's. The process of compositing then combines both the RGB and Occlusion layers along with the backgrounds which are done on separate passes along with things like Dynamics and Shadows. These are often done separate either to have more control or to try and reduce render times.
Saturday, 23 May 2009
FInal Intro (Shot 01)
Below is a final render of Shot 01 showing the graphics based intro which transitions into 3D. Obviously still needs grading.
Jail Cell Texturing - By Ajdin
Here are some screenshots of Ajdin's unrendered texturing for the Jail Cell. So far so good, very grimey as we wanted it and should act as a nice scene. Should have this supplied to us early next week so we can finalise animation and rendering.


Final Renders
Here are some sneak preview shots of the final renders we have been creating. I will be showing how we are compositing and rendering things fully later on. But hopefully this will get you excited about the film.


Schedule WC 25/05/09 - 4 weeks to go!

Crunch time now! 4 weeks until the film needs to be handed over to post guy for grading and also to give a few days for sound to be finalised at the same time. The good thing is that this ties in with our 304 hand-in and alot of our submission can be rendered final elements.
Here is what we have each to do: -
Matt - 14 Shots of animation, tweaking and finalising existing shots that are complete, exporting animation for rendering, putting final quicktimes into a finished HD Premiere file.
Josh - 2 Shots of animation, tweaking and finalising existing shots that are complete, completing NCloth on all Bandit bandana's and Sheriff waistcoats.
Kanika - 6 Shots of animation, tweaking and finalising existing shots that are complete
Tony - painting backgrounds and doing an illustration for the newspaper.
Sam - building final scenes together for rendering, render testing and settings, lighting adjustments, texture adjustments, dynamics.
Harv - 5 Shots of Animation, Train Animation in Mines, building scenes for rendering, render testing and settings, compositing, additional effects in After Effects, final renders.

This is then an additional schedule I have made to clearly lay out each days work as we can have a stronger shot by shot focus on what needs to be completed on certain days. This means that everyone will be animated on time and it is also important for making sure we reach our quota for renders being put on each night.
Tuesday, 19 May 2009
Another New Ending Concept
After discussing an idea last week, we chatted with Dan this week and came up with something even easier and simpler, cutting down on time and animation to be done.
Using the same kind of transition as the beginning of the film with the Wanted Poster going into the 3D media, we will go from the bars crashing down around the Bandit to a still freeze frame and as this pans out it will reveal a newspaper with something like 'El Bandito Behind Bars' as the headline and within the newspaper layout we will incorporate our credits into the text.
Then the image will punch back in quickly to show the Bandit grabbing the bars and yanking them frantically. We will need to edit this to see if it works but it should be successful and help us time-wise.
This also removes the following -
- Prison establishing shot
- Jail Cell Establishing Shots and Build-up Animation
- Credit and Logo Graphics
Shot 57A Animation
This shot is a combo of two pieces of animation. One is the prisoner removing the pin from the carriages and the other is the Bandit's gasping reaction. Above is the playblast of the animation which I am quite happy with. Also below I have done a comp test to show how the shots will fit together using an alpha of a ripped/torn piece of paper which fits in with the roughness of some of the elements.

The black region is where the Bandit will be positioned and Matt can use this as a guide for the animation. Also he will use my timings to judge the timing of the expression animation.
We may also use this device again in the film to make it not seem like a one off style as we want to incorporate a marshal close-up reaction during the fight scene.
Sunday, 17 May 2009
Website Design


I've spent today working on the site for the film. Decided to have a main page for the film along with a links and credits page. Also going to have a Gallery section which will also double up as a kind of making of and show the key components of the production. Within each section of the gallery a different section will be covered using either a showreel or a selection of images. A showreel will allow up to demonstrate things such as rigging, animating, and compositing better.
Thursday, 14 May 2009
The Ending....Still An Issue....But Here's A New Plan!
Ok. The topic of the ending was raised again today as it still seemed to take the flow out of the shots and seem a little 'tatty' in terms of construction and editing. In light of this I gave it a thought with Josh and figured out why, as well as coming up with a solution.
The reason it doesn't flow is because the environments and styles constantly change in the matter of a few shots. You go like this Back of Train > Jail Interior > Jail Exterior > Graphic and Credits > Jail Interior. Basically its too much too quickly and it never lets the new environment at the end really have any establishment and therefore it lacks meaning, appeal and purpose.
SOLUTION: -
Basically remove the graphics and integrate the credits and final logo within the jail cell environment. This could also mean that we remove the establishing shot of the prison exterior. This then means that once the jail cell crashes down around the Bandit, we are effectively trapped in there alongside him as the audience. We then have a couple more establishing shots with the Bandit in the Jail Cell and the credits will be scratched into the crumbling walls which means there is a mix of character animation and credits going on so the credits aren't so static and it also means the medium doesn't change drastically at the end by going to a 2D graphic, but maintains more shots which fit back-to-back. We'll knock it up in the coming week to see if it works!
First Renders


Finally Sam and I began some rendering this week. Here are two visuals showing the look and feel of the texturing and lighting in its final form. We will still have grading and effects to add to these as well as the wide establishing shot still needing Occlusion. Overall I think it has that soft shaded look like Team Fortress 2 while still taking on some more detailed texturing in the close-up's. We will continue rendering out the shots we can for now and this should start chipping away the time consuming process of rendering.
Sunday, 10 May 2009
Shots 6, 8, 10, 12 - Train Animation
This shows the animatic with the train shots placed in. I think the first one could do with a little sideways movement as opposed to just being static. The second and third train shots I feel are working really well in terms of composition however the fourth needs smoothing out in terms of the pan round and also the composition. Possibly needs more of a 'handy-cam' feel to make it seem like it is a direct view from the eyes of the Bandit.
Schedule WC 11/05/09

Scheduling hasn't changed this week. We are all making progress with the animation. It seems Sam is tying up alot of loose ends in terms of texturing and I've moved on to start getting some of the train animations done. I will however go back to more character animation if we need to shift the workloads.
So as an overview,
Matt - Character Animation
Josh - Character Animation, nCloth, Dynamics
Kanika - Character Animation
Sam - Texturing, Lighting, Rendering, Dynamics
Tony - Background Painting
Harvey - Character and Train Animation, Compositing, Rendering, Post Effects, Dynamics
Friday, 8 May 2009
Shot 36 - Prisoner Bottle Throw
This shot worked really well going from stepped to splined. In terms of the animation I am pleased with the snap and the energy in the throw. I think I am really starting to get along with how the rig can bedst be used etc.
Matt and I made some key decisions on this shot. I felt the animation worked better by him throwing the bottle rather than it getting shot in his hand and him holding onto the smashed bottle neck.
In light of this I then also suggested that the shot order could be altered so that the previous shot of the Sheriff shotting would now come after this shot. This works really well and is more obvious in terms of telling the audience that the Prisoner is throwing a bottle and the Sheriff is shooting it out of the air rather than the Sheriff shooting randomly and then realising that the bullet is hitting the bottle he is throwing.
Shot 8 - Train Animation
This is a shot we have nailed down to establish the introduction of the train. Before this is a close up of the train pistons which I will be working on next. We discussed this shot at length and several of us decided this was a good balance between being high up enough to not seem like the Bandit's viewpoint but also far away enough from the train to contrast with the previous close-up. This shot also ditacts the pace of the train before it gets sped up in the fracas.
Thursday, 7 May 2009
Shot 50 - Prisoners Think To Escape
This is quite a difficult shot as there is a lot of motion going on amongst all 3 characters in such a short space of time. I spent alot of time trying to get the first prisoner really well animated although I think this guy still needs alot more snap and punch to his movements. I am quite happy with the bounce and sudden jump up of the other 2 in the background however. Also combined with the audio this shot has greater appeal as the fast nature of the animation fits the audio's pace.
Friday, 1 May 2009
Schedule WC 04/05/09

This is an updated schedule brought into line with the new timescale for animation to be completed by the end of May, thus making more time for post-production. The remaining work is divided as follows: -
Matt - Bandit animation, placing in shots and organising sound designer
Josh - Prisoner and fight scene animation, nCloth shots and caching, prisoner deformers, dynamics
Sam - Remaining environment texturing, environment lighting, rendering, train animation, compositing
Kanika - Marshal and Sheriff animation
Tony - Painting background planes and landscape backgrounds, map illustration, website design
Harvey - Prisoner animation, train animation, rendering, compositing, After Effects shots, dynamics and effects, finalising intro sequence, website design, presentation boards for shows, branding and promotion
Subscribe to:
Posts (Atom)


