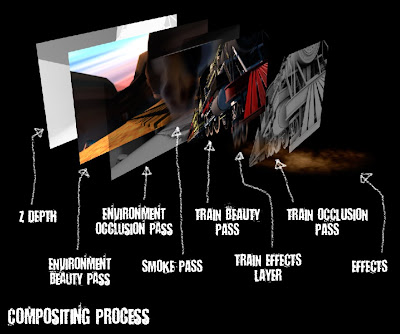
Compositing is a really important process to bring the render passes together and then also add some finer details and effects which would be extremely complex to add in something like Maya. As you can see in the example above we have a number of layers brought together to form a shot. Here is a breakdown of the layers: -
- ZDepth - This is used in conjunction with a Lens Blur filter to each RGB layer and it creates the effect of Depth of Field, meaning the objects that are far away can be blurred out of focus while the foreground elements remain sharp and in focus.
- RGB Layers - These provide the colour and lighting and overall texturing.
- Occlusion layers - These work out where light should not pass in certain zones. By multiplying these layers onto the RGB, it then adds more shading and shadows.
- Smoke Pass - This is for the main dynamics in a scene, very important for our train shots but not used in most shots throughout the film.
- Train Effects - The train RGB layer, or any layer for that matter can be duplicated so that a particular area can be affected in a certain way. In this shot I have masked the pistons of the train and tracked the camera movement so that a directional blur can be applied to exaggerate the speed of the pistons.
- Effects layers - Lots of subtle effects are added in After Effects. In this scene I have added dust blowing down the side of the train to show the sand kicking up as the train speeds past. In other shots I will add dust blowing across the desert floor and things like bullet ricochets, sparks and dust crashes.
By adding all these elements together it adds to the realism of the shot and builds up the complexity of the motion, something much easier to do in post production than in Maya.


No comments:
Post a Comment